







Download Product Data
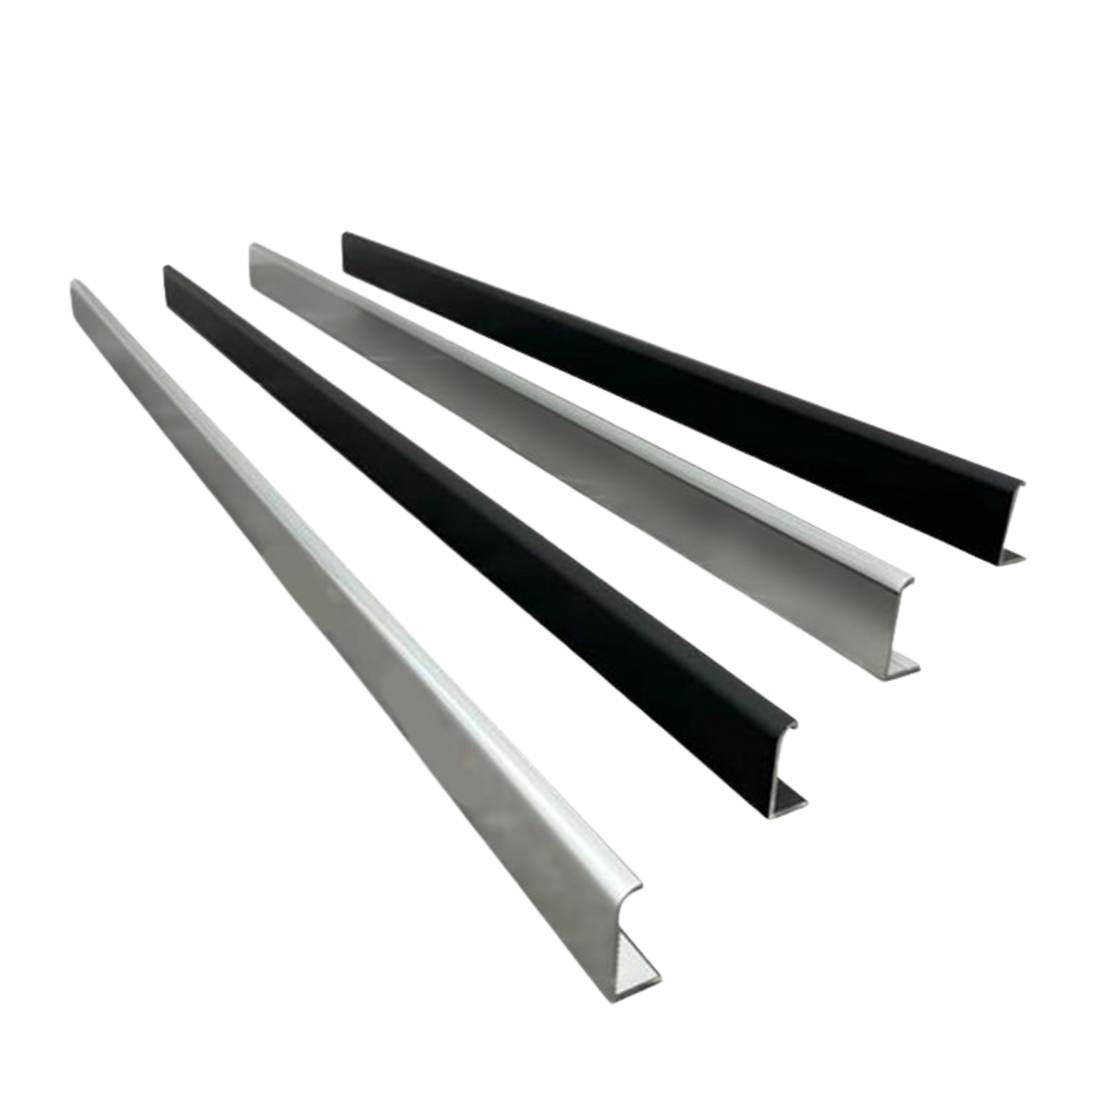
For wet area entries where the floor is bedded or screeded, Waterstop Doorline provides a clean, cohesive transition at the door sill. This door sill extrusion is designed to maintain a consistent look throughout the bathroom, matching the appearance of Waterstop Streamline showers while establishing a secure waterproof barrier at the entry boundary.
How it works
Waterstop Doorline integrates directly with the wet area's waterproofing and substrate layers through a dual-serrated extrusion design:
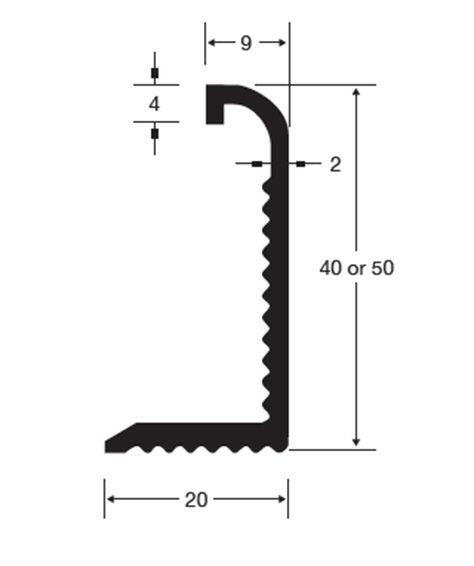
- Membrane adhesion: The internal vertical leg features a serrated surface, giving waterproofing membranes a high-friction profile to bond securely to the extrusion and prevent water bypass at the sill.
- Substrate bonding: The 20mm horizontal base leg is also serrated, providing a keying surface to securely glue the extrusion down to the floor substrate.
- Sill safety and protection: A 4mm external curve radius creates a safe, rounded bull-nose step-over profile. To prevent damage from trade traffic during construction, the external face of the vertical leg is pre-covered with protective tape.
Numbers that matter
- 40mm or 50mm vertical heights: Accommodates standard screed and bedding depths to ensure the sill barrier matches finished floor levels.
- 20mm horizontal leg width: Provides the correct surface area for adhesive contact with the subfloor.
- 2mm internal leg thickness: Delivers a rigid vertical profile that resists deflection under foot traffic.
- 1 metre or 3 metre lengths: Supplied in standard lengths that can be trimmed on site using a standard hacksaw.
Size and finish options
Waterstop Doorline is supplied in packs of six in the following configurations:
- 40mm height: Available in 1 metre lengths (Code: 1000DL40) or 3 metre lengths (Code: 3000DL40).
- 50mm height: Available in 1 metre lengths (Code: 1000DL50) or 3 metre lengths (Code: 3000DL50).
- Finishes: Bright Silver and Matt Black.
Frequently asked questions
Can Waterstop Doorline be installed over a tiled floor?
No, Waterstop Doorline must be installed before tiling. It integrates with the screed and waterproofing membrane, ensuring a watertight and flush finish at the wet area entry.
Is a primer needed for bonding Doorline to the substrate?
Generally, no primer is needed for standard screeds. The serrated base enhances adhesive contact. Always ensure the substrate is clean, dry, and free from contaminants for optimal adhesion.
How should Doorline be cut on site?
Waterstop Doorline can be trimmed with a standard hacksaw. Use a fine-tooth blade for a clean cut and de-burr all cut edges before installation to protect membranes.
Does Doorline require installation before waterproofing?
Yes, Doorline must be installed prior to waterproofing. Its vertical serrated leg is specifically designed to bond with the membrane, which is critical for watertight performance.
What is the difference between 40mm and 50mm Doorline options?
The height options provide flexibility for varying screed depths or desired floor profiles. 40mm suits standard applications, while 50mm offers coverage for thicker screeds or elevated transitions.
Applications and benefits
| Application | Key benefit | Primary trades |
|---|---|---|
| Wet area entry transition in bathrooms | Forms a compliant, watertight sill profile for direct waterproofing membrane integration. | Waterproofers, Builders |
| System component for Waterstop Streamline showers | Creates a cohesive and integrated waterproofing line around the perimeter of wet areas. | Bathroom Designers, Renovators |
| Installation in screeded or bedded floors | Integrates reliably into common wet area substrates due to its serrated profile for strong adhesive grip. | Tilers, Waterproofers |
| Onsite trim-to-fit installations | Allows for precise adjustments on site, minimising material waste and speeding up installation. | General Contractors |
Applying Waterstop Doorline: Protocols & Best Practices
General Application Steps:- Preparation: Ensure the substrate is clean, dry, and prepared as per the Adhesion & Preparation Guide. Measure and cut Doorline to required length using a fine-tooth hacksaw. Dry-fit before bonding.
- Application: Apply a bead of high-grip construction adhesive along the serrated base of the extrusion. Press Doorline firmly into place. Use weights or tape to hold it until the adhesive sets.
- Waterproofing: Once set, apply waterproofing membrane directly onto the serrated vertical face, ensuring full coverage and adhesion.
- Tiling: Proceed with tiling once membrane is fully cured. Align tiles flush with the Doorline for a seamless finish.
The Engineering Challenge: Maintaining membrane continuity while achieving a clean tile finish at the bathroom threshold.
The System-Based Solution with Waterstop Doorline: The serrated vertical leg anchors the membrane, while the bullnose face aligns with tile edges for a consistent visual line and waterproof barrier.
Best Practice Note: Apply waterproofing to the vertical leg before setting floor tiles to avoid membrane bridging gaps.
The Engineering Challenge: Membranes pulling away from door thresholds over time due to poor mechanical grip.
The System-Based Solution with Waterstop Doorline: Serrated faces enhance mechanical interlock, giving superior anchorage for both liquid and sheet-applied membranes.
Best Practice Note: Apply membrane in multiple coats or with reinforcing mesh over the serrations to maximise hold.
Product limitations
- Not for: Direct installation over tiled or pre-finished floors. Waterstop Doorline must be installed before waterproofing and tiling.
- Installation method: The extrusion must be secured using a compatible construction adhesive. Mechanical fasteners are not recommended as they may compromise membrane integrity.
Safety and handling
Personal protective equipment
Gloves and eye protection are recommended during any cutting operations.
Ventilation
Ensure good ventilation when using adhesives or membranes in enclosed areas.
Handling
Exercise caution when cutting the extrusion. Always de-burr all cut edges to prevent potential damage to membranes or finishes.
Substrate guide
Proper substrate preparation and primer selection ensure durable adhesion and long-term performance for Waterstop Doorline.
Screeded floor
Surface prep: Ensure the screed is fully cured, clean, and free from dust or laitance. Thoroughly sweep and vacuum before adhesive application.
Primer: Not required.
Concrete slab
Surface prep: The surface must be dry and free of oils, curing agents, or contamination. Abrade the surface if necessary to achieve a clean profile.
Primer: Not typically required when using high-performance polyurethane or construction adhesives.
Fibre cement sheeting
Surface prep: Wipe with a damp cloth to remove any dust. Ensure the sheeting is stable and securely fixed.
Primer: Optional. Refer to the adhesive manufacturer's recommendations for specific requirements.
Waterstop Doorline Physical Properties
| Property | Value |
|---|---|
| Material Type | Aluminium |
| Finish Options | Bright Silver, Matt Black |
| Available Heights | 40mm, 50mm |
| Available Lengths | 1 metre, 3 metre |
| Installation Method | Adhesive bonded to substrate |
| Profile Type | Bullnose |
| Surface Detail | Serrated internal legs for membrane and adhesive grip |
| Cutting Method | Hacksaw |
| Application Substrates | Screeded floors, Concrete slabs, Fibre cement sheeting |